
Appchar WooCommerce store application It has many features, of course, you must be familiar with its settings to be able to use it well. After installing the Apchar plugin, the Apchar tab will be activated inside your WordPress. This tab consists of different parts. One of these parts is settings. Easily configure your WooCommerce store application.
Different parts of WooCommerce app store application settings:
First, the images related to the settings section are attached for you, and then based on the numbers entered in front of each section. Explanations are provided.
As shown in the images below, the settings section of the WooCommerce store application consists of two sections: general settings and notification settings. Notification settings in full Another article It has been described. General settings are explained below.

1- The type of display of categories on the categories page:
This part is one of the things that you should pay attention to in the settings. There are three classification models that you should pay attention to while using each one.
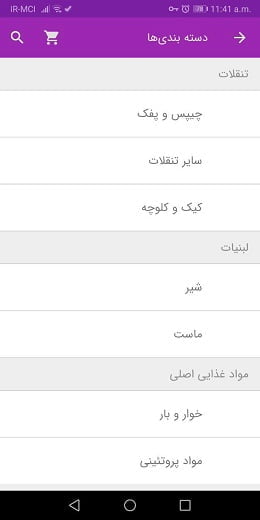
First mode: 1-level categorization: the main categories are placed in a row and by clicking on each category, its subcategories are displayed in the same way.
Second mode: 2-level categorization: In this case, the categories must be at least two-level, and if a category is not a subset, it will be removed from the display list. Also, parent categories are not clickable and only sub-categories are clickable.
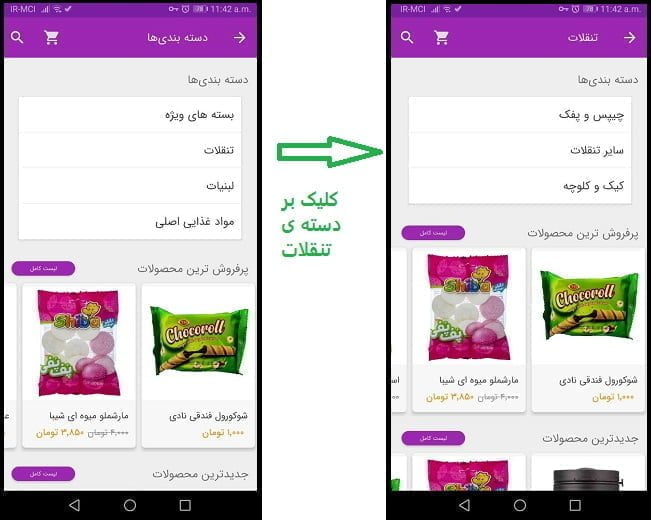
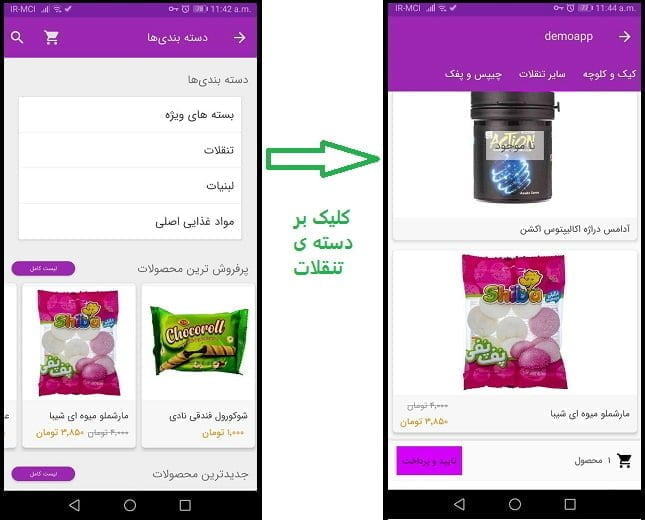
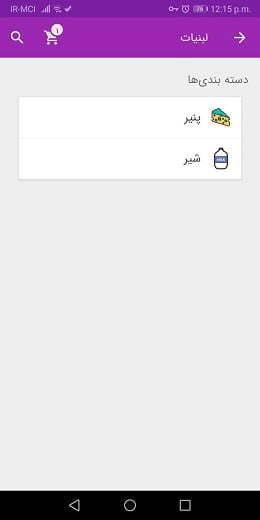
The third mode: single-level categorization and displaying sub-categories as tabs: In this situation, the parent categories are displayed like the first model. But its sub-categories will be displayed as tabs and the products will be single columns. The image below shows how to display sub-categories.
Note that in this case, you must observe two points: First, no product should be assigned to the parent categories. For example, in our example, the snack category itself should not be assigned to it. Second, there should be only two levels (two layers) of classification. If you don't follow the mentioned points, you may see many crashes in this section.
Note: If you want the categories to have images. It is enough to refer to the categories section of your site and put the appropriate icon for the categories you want.
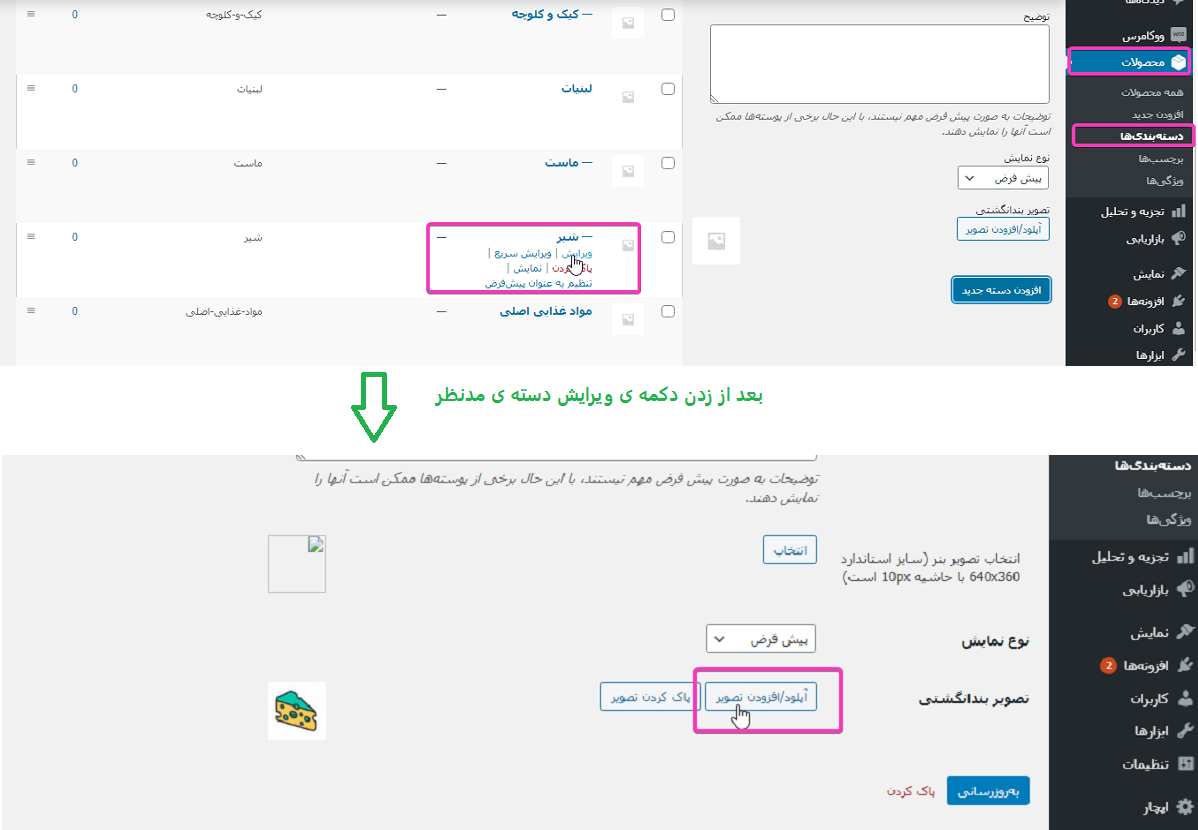
Display photos of categories in the application:
If the uncategorized category is displayed in your categories, just delete that category. First, you need to set another category as default. Then delete the uncategorized category.

2- Display type of discount percentage:
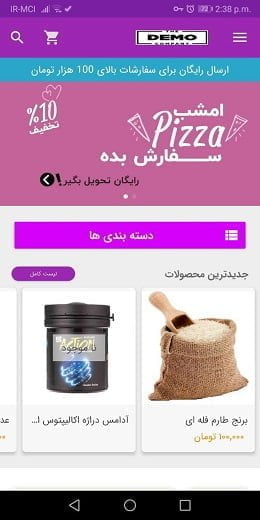
Maybe you want to show them the amount of discount you give to your customers. For this purpose, 3 modes are considered. 1- Not displaying the discount percentage 2- Displaying the discount percentage in a circle. 3- Display the discount percentage as a bar on the application. 3 modes can be seen in the image below.

3- Type of payment gateway:
3- Type of payment port: if you want your port to open in web view when connecting to the bank port, set it in in-app mode and if you want the phone browser to open in out-of-app mode.
4- Show short description for the product:
Display short descriptions: In the application, you can either display short descriptions or long and original product descriptions. Disabling the short description will display the main description.
5- Change the text of the add to cart button:
You can change the text of adding to the shopping cart according to your taste. For example, place an order, add to cart or any other title. Note: This text is only displayed for simple products and not variable.
6- Changing the text of featured products:
This item does not exist in the application and will be deleted.
7- hide signup page:
If you want certain users to be able to buy in your app and not every user can register, you can disable the registration page and only the login page remains.

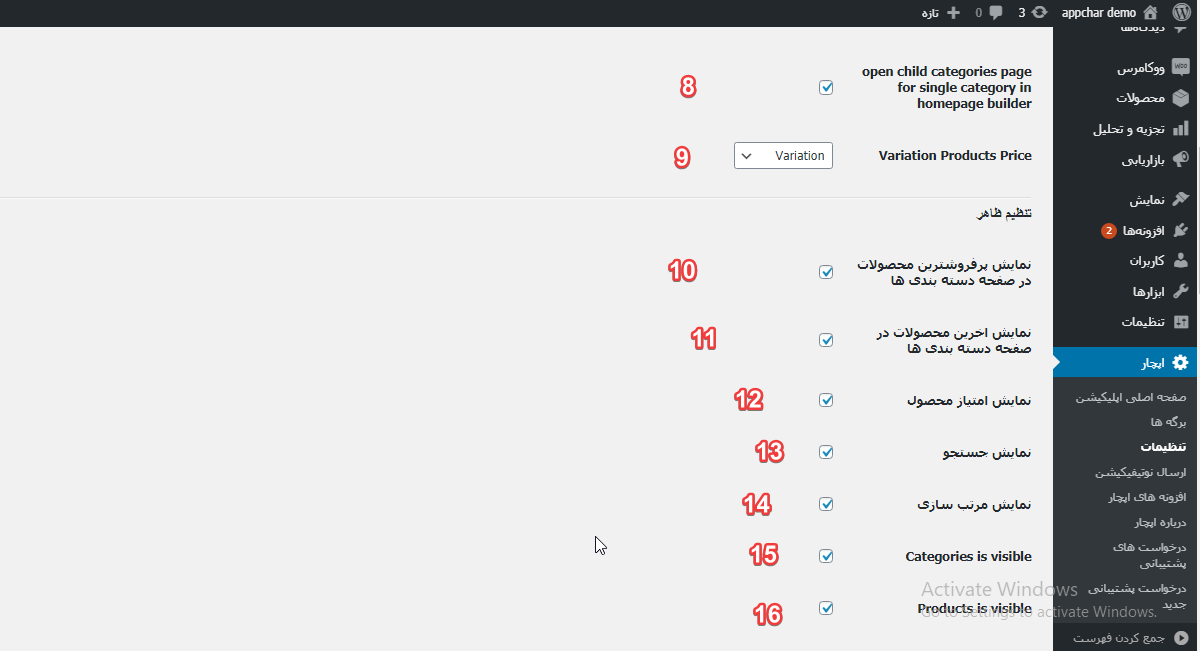
8- open child …..:
On the first page of the application, you have a page builder, where you can create banners, grids, etc. and link them to categories, products, etc. When linking to categories, one category may be the parent category with multiple subcategories. By selecting this option, if the category is the parent, its subcategories will be displayed instead of a list of products. If disabled, a selection of products will be displayed by linking to the category.
9- Variation Products Price:
Variable product prices are displayed by default in WooCommerce as a price range from the lowest price to the highest price. You can display the lowest price, highest price or price range in the application according to your taste.

Items 10 to 15:
According to their titles, it is clear that you can remove and disable these items from within the app. These items are related to both Android and iOS apps
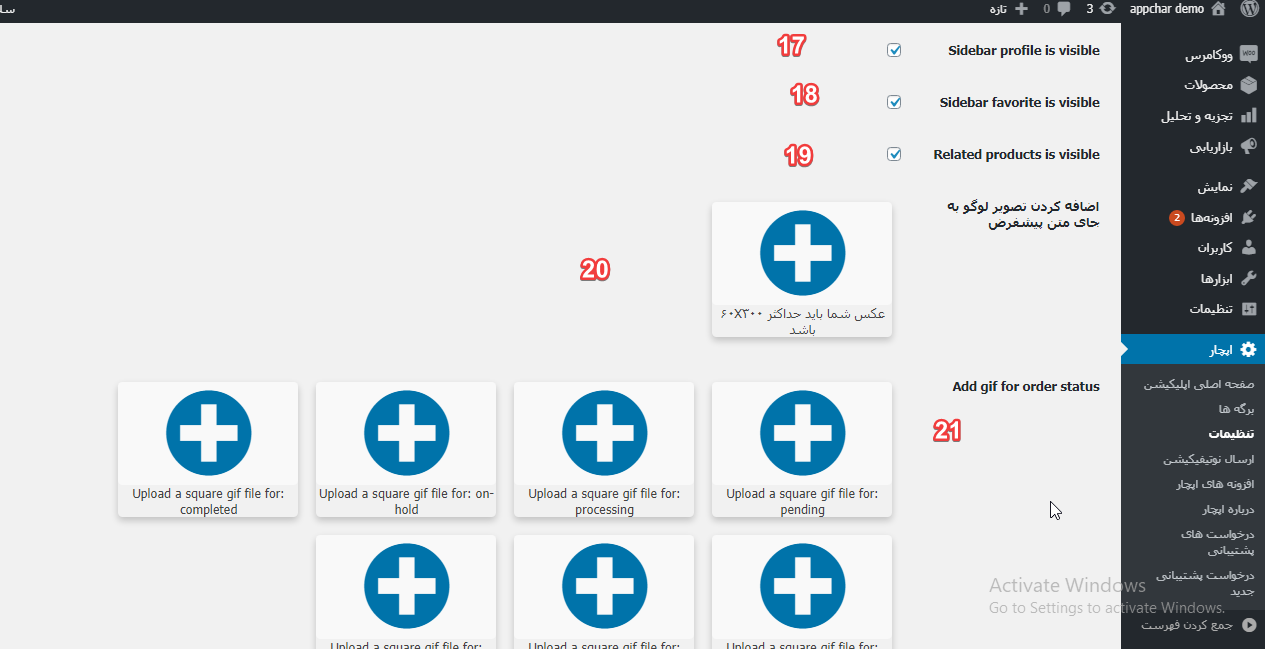
Items 16 to 19:
The items are related to the ios application and only display or not display items in the application menu.
20- Adding a logo image instead of text:
In this section, instead of the app name, you can place a small and suitable logo on the top of the application. Try to have this logo specially designed for this part and make sure it has a transparent background that does not spoil the display of the app. According to the given information, the dimensions of the photo should be maximum 300 x 60.

21- Add gif for order status:
In this section, you can put GIF or regular images for different order statuses. Note that this part is only built for Android and is not available in the iOS version.
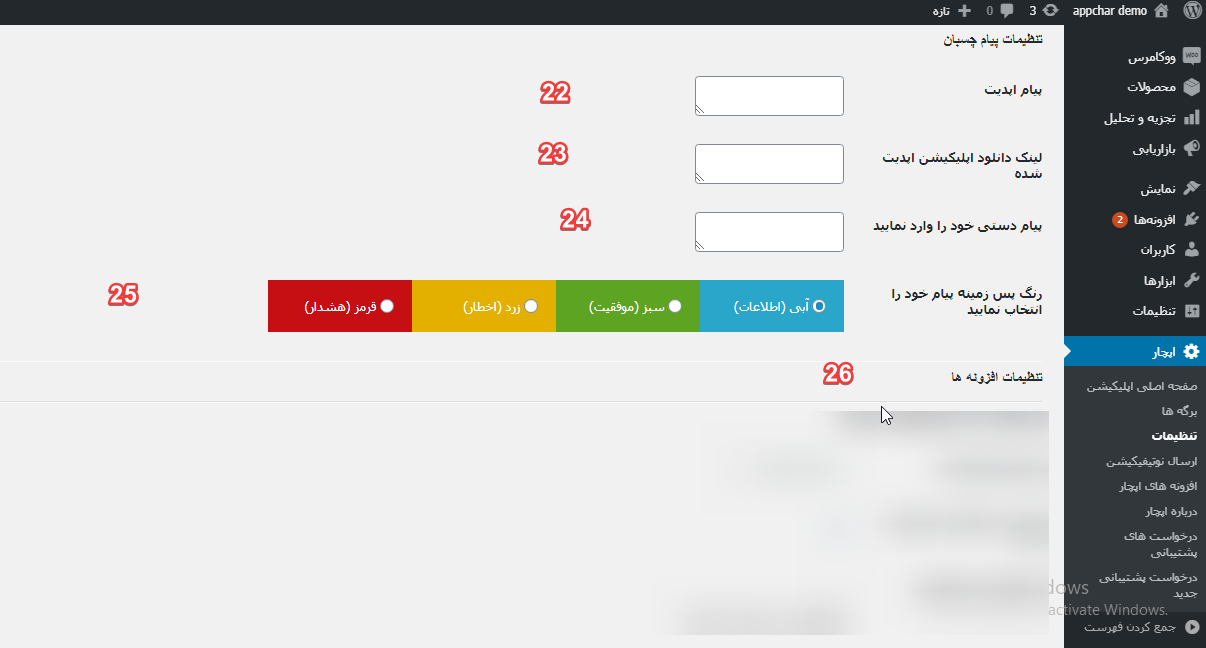
22 and 23- Update message and update link:
The update message is displayed in the app when the user has installed the old version. It is enough to put the desired message and set the app link or a page on your site where the app link is located. When the user has the old version of the app installed, as soon as the application is opened, a similar image will appear. See below.

24 and 25- Manual message and its background color:
If you want to display a message publicly at the top of the app or if you want a special notification temporarily, you can use this section. You can also choose its background color. In the image below, the free shipping text is placed with a blue background.
26- Appchar plugins settings:
In this section, the settings related to some external plugins will be added. It remains a professional shopping cart, blog and...
June update:
In June, two parts were added to Appchar settings:
A) Mandatory download:
In the description above (numbers 22 and 23), you could set the update message. Of course, the message is not mandatory to update in any normal mode, but by adding this possibility, the user will not be able to use the application unless he updates the application. According to the image below, in addition to setting the message and giving the link, the mandatory update option must also be activated. be


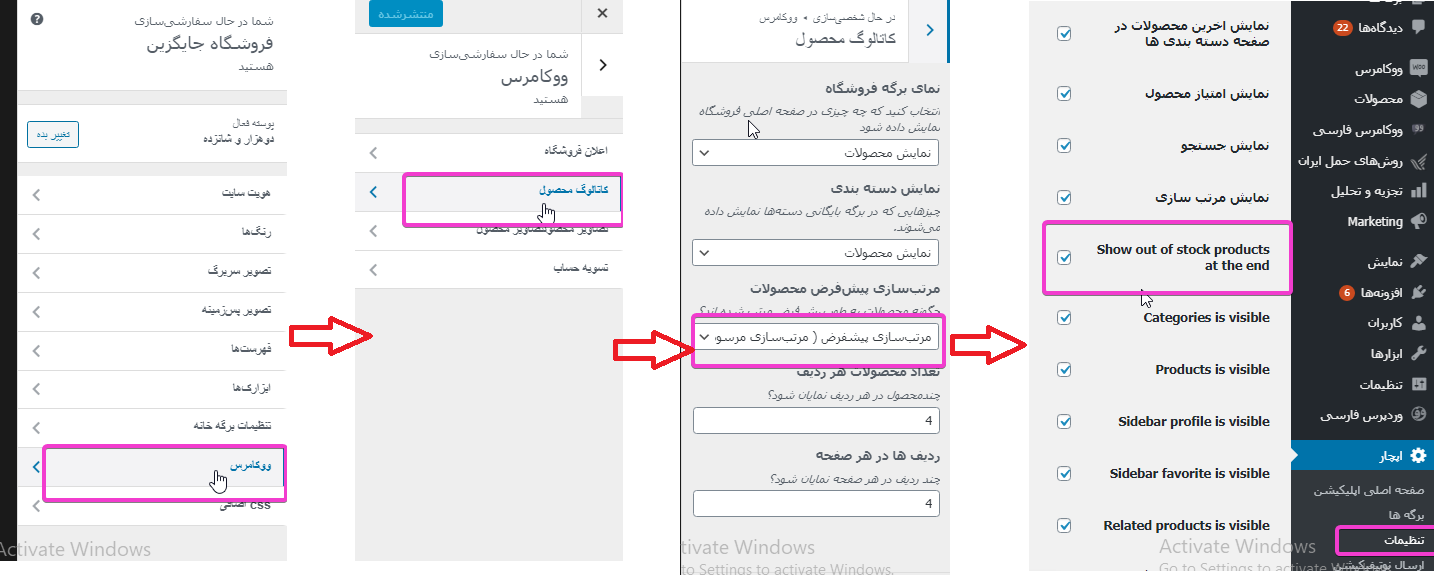
b) Displaying products according to stock and most popular:
In this case, by making settings, you can display the products that are not available at the end of the list and the most popular ones will be displayed at the beginning of the list. To do this, just go to your site, the display section and select the customization option. Then go to the WooCommerce section, product catalog and select the default sorting. Then go to app settings and activate the option related to this item.
To be able to get results faster, just go to the product list and click edit product and rate the order menu in the product details section, advanced. By default, zero is considered for non-existent products, and the smaller the given number, the higher the products will be. For example, a product with a negative rating of 2, then negative 1, and then a non-existent product is placed.
According to the above instructions, you can easily configure your WooCommerce store application. Please pay attention to the mentioned points and check the result every time you make an adjustment.
July update:
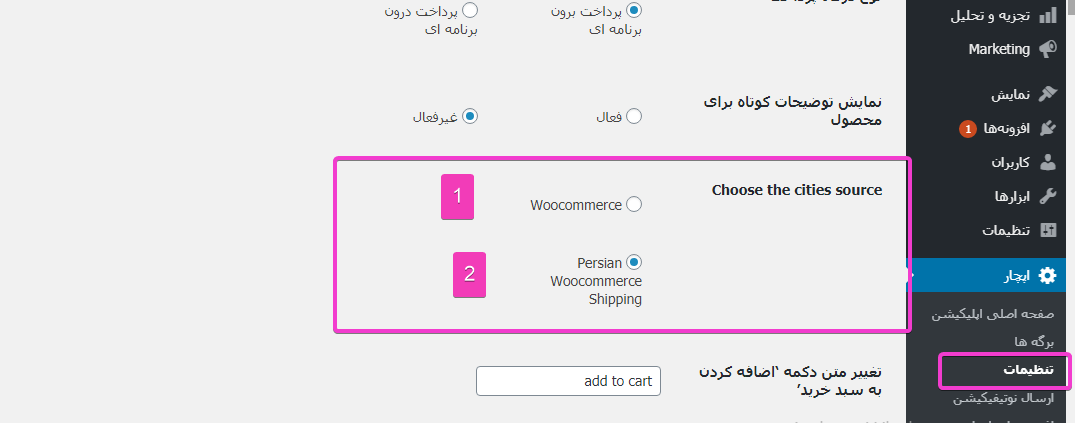
One of the important things that changed in the application and add-on in July is related to transportation and transportation cities. In Apchar settings, the option of choose the citis source has been added.

1- Woocommerce mode: In this mode, the user must type the name of the city himself. This is the basic mode of WooCommerce. And the application used to support this mode, and all the settings you used to make for shipping (whether the post plugin, WooCommerce, or the plugin for editing the Appchar checkout fields) work correctly in this mode.
2- persian woocommerce shipping: In this case, the list of cities is loaded from the WooCommerce shipping plugin, and that plugin must be activated and configured.
Tip: Don't forget, before anything else, configure WooCommerce correctly in the general section.
Old users must have updated their application to be able to use the WooCommerce shipping option.
The second thing in the July update is the addition of countries to the application.
October update:
Adding the bottom menu on the first page of the application and changing the search display on the first page of the application. (Note: This item is still under development and is not completed, but it can be used)
By going to the settings section and activating the following option, the display mode will change.

How to display the new application:

Spring 1401 update:
In this update, an option to hide non-existent products has been added in the settings section. According to the image below, there are three modes.
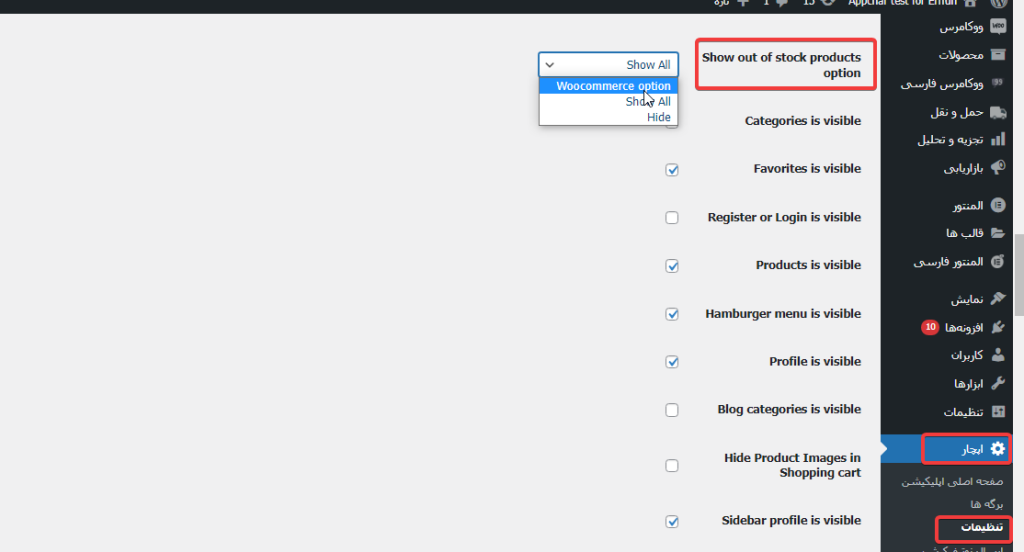
1- The first mode: woocommerce option: in this mode, everything that is set in the Woocommerce configuration happens (the viewing or hiding of non-existent products on the site and the application are coordinated). Next, the location of its settings in WooCommerce will be displayed.

2- The second mode: show: In this mode, even if non-existent products are hidden on the site, they will be displayed in the app.
3- Third mode: Hide: In this mode, even if non-existent products are visible on the site, they are not displayed in the app.


